

Counter-Strike 2 (CS2) is Valve rebuilt competitive shooter running on the Source 2 engine – a major technical leap from CS:GO. With the engine upgrade came significant changes to how the game handles performance, rendering, and configuration. Launch options remain one of the most effective ways to fine-tune your setup before the game even starts, but many commands from the old CS:GO era no longer work or have been replaced by new alternatives.
In this updated 2026 guide, we cover only the launch options that actually work in CS2, what they do, how to set them correctly, and which ones pro players rely on. We also clear up some persistent myths about commands that were removed or became obsolete after the CS2 launch.
What Do CS2 Launch Options Do?
Launch options are commands entered in Steam before starting CS2. They instruct the game engine how to initialize – covering everything from rendering mode to CPU priority. Here is what they can control:
- Performance optimization: Certain options help allocate CPU/GPU resources more efficiently, reduce micro-stutters, or switch the rendering backend to one that performs better on your hardware.
- Graphics and display: Resolution, refresh rate, fullscreen mode, and rendering API (DirectX 11 vs. Vulkan) can all be set via launch options before the game loads.
- Startup behavior: Commands can skip intro videos, preload map assets, or auto-execute a configuration file the moment the game opens.
- Input and network: Options for disabling joystick support, removing VSync, or forcing specific network update rates help reduce input lag and improve hit registration.
How to Set CS2 Launch Options
Setting launch options in CS2 via Steam takes under a minute:
- Open Steam: Launch the Steam client on your computer.
- Go to your Library: Find Counter-Strike 2 in the list of installed games.
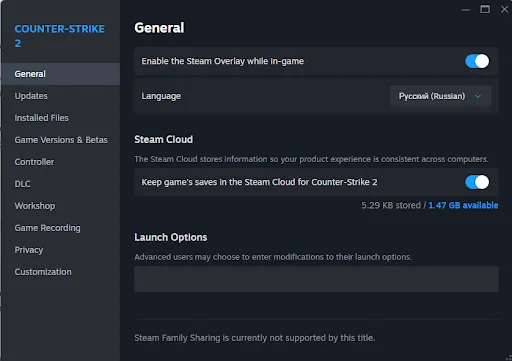
- Open Properties: Right-click on CS2 and select “Properties” from the dropdown menu.
- Find the Launch Options field: In the General tab, you will see a text field labeled “Launch Options” (in older Steam UI this was a separate “Set Launch Options” button).
- Enter your commands: Type your launch options directly into the field. Each command should be separated by a space. Commands typically start with a “-” or “+” prefix.
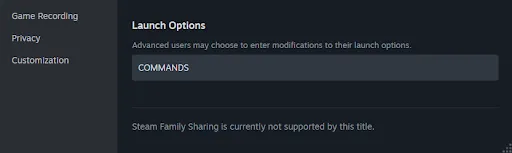
- Close and launch: Changes are saved automatically when you close the Properties window. The next time you start CS2, the options will apply.
- mportant: avoid quotation marks, brackets, or extra symbols in the launch options field – only use letters, numbers, hyphens, underscores, and plus signs.
Best CS2 Launch Options
Below are the launch options that reliably work in CS2 as of 2026. This is not an exhaustive list of every possible command – it is a focused selection of the most impactful and verified options:
- -console: Enables the in-game developer console at startup. The console lets you enter commands, check your network stats, adjust settings on the fly, and execute config files. Essential for any competitive player.
- +fps_max 0: Removes the default FPS cap, allowing CS2 to render as many frames as your hardware can produce. For players with high-end systems and high-refresh-rate monitors (144Hz, 240Hz, 360Hz), this is one of the most impactful options. If you experience instability, set a specific value like +fps_max 300 instead.
- -nojoy: Disables joystick and controller support. Unless you actively use a gamepad in CS2, this frees up a small amount of system memory. It is a low-risk option worth including.
- -high: Sets the CS2 process to high CPU priority. This tells your operating system to allocate more resources to CS2 over background processes. On most systems it helps; on a small number of configurations it can cause instability – test it and remove it if you notice issues.
- -fullscreen: Forces the game to start in true fullscreen mode. Fullscreen gives better GPU utilization than windowed or borderless windowed modes because the OS stops rendering other interface elements in the background. Most competitive players use this.
- -refresh [rate]: Sets your monitor refresh rate explicitly. For a 144Hz monitor use -refresh 144, for 240Hz use -refresh 240, and so on. CS2 usually detects the correct refresh rate automatically, but specifying it manually ensures consistency.
- -softparticlesdefaultoff: Disables depth-blended particle effects, reducing GPU load on smoke, fire, and explosion rendering. This can noticeably improve performance on mid-range hardware without a dramatic visual impact.
- +mat_disable_fancy_blending 1: Disables fancy texture blending, which slightly reduces texture detail but can improve FPS, particularly on systems with limited VRAM.
- +r_dynamic 0: Disables dynamic lighting. This means gunfire muzzle flashes and flashbang lighting effects are reduced. The tradeoff is performance gain versus a minor visual disadvantage – competitive players with weaker GPUs often enable this.
- +mat_queue_mode 2: Forces the material rendering system into asynchronous multi-threaded mode. On multi-core CPUs this can provide a meaningful FPS uplift. It may cause instability on some systems, so test it before relying on it in matches.
- -forcenovsync: Explicitly disables Vertical Sync regardless of what is set in your graphics driver or in-game settings. VSync introduces input lag in return for preventing screen tearing – most competitive players disable it entirely.
- +violence_hblood 0: Removes high-violence blood effects from the game. Not a performance option, but some players prefer a cleaner visual experience. Note that this command may not function on all CS2 builds – results can vary.
- +r_drawparticles 0: Disables particle animations entirely. This can improve FPS, but removes visual feedback from effects. Use with caution.
- +cl_forcepreload 1: Forces CS2 to preload all map models and textures before joining a server. This increases initial load time but significantly reduces stuttering and micro-freezes during matches – especially useful on HDDs or slower SSDs.
- +exec autoexec.cfg: Executes your custom autoexec configuration file at startup. If you use a personalized config with crosshair settings, binds, and network tweaks, this ensures it loads every time. Place the file in: Steam\SteamApps\common\Counter-Strike Global Offensive\cs2\cfg\
CS2 Pro Launch Options
Professional CS2 players tend to keep their launch option lists lean and focused on what is verified to work. Here are some advanced options that pros commonly include:
- -vulkan: Switches the rendering API from DirectX 11 to Vulkan. Vulkan can improve performance on certain hardware configurations, particularly AMD GPUs. Not universally better – test it on your system.
- +engine_low_latency_sleep_after_client_tick true: Adjusts when the engine low-latency sleep happens within the game tick cycle. Can reduce micro-stutters. Works best when combined with a capped FPS value rather than +fps_max 0.
- +cl_interp_ratio 1 +cl_interp 0.031: Interpolation settings that control how CS2 smooths out player movement between server updates. The values 1 and 0.031 are widely used in online competitive play for a good balance between smoothness and responsiveness.
- +rate 786432: Sets your network data rate to the maximum allowed value, ensuring your client requests and receives the maximum amount of server data per second. Recommended for all players with a stable broadband connection.
- -insecure: Disables Valve Anti-Cheat (VAC). Only use this if you play exclusively on third-party platforms like FACEIT or ESEA that use their own anti-cheat. Never use -insecure on Valve Matchmaking or Premier.
CS2 Resolution Launch Options
You can control the game display cs2 resolution and window mode through launch options:
- -w [width] -h [height]: Sets the game resolution. For example, -w 1280 -h 960 launches CS2 at 1280×960. Useful for players who use non-standard resolutions for stretched or 4:3 gameplay.
- -fullscreen: True fullscreen mode – recommended for maximum performance.
- -windowed: Runs CS2 in a resizable window.
- -noborder: When combined with -windowed, removes the window border to create a borderless fullscreen appearance. Some players prefer this for easier alt-tabbing.
- -x [value] -y [value]: Positions the CS2 window on your screen by offset from the top-left corner (pixels). Only relevant when using windowed mode.
144Hz, 240Hz and 360Hz Launch Options
If you want to ensure CS2 runs at your monitor full refresh rate, set it explicitly with the -refresh flag. CS2 usually detects the correct value from Windows display settings, but specifying it manually removes any ambiguity:
- -refresh 144: For 144Hz monitors. A safe default for most mid-range gaming setups.
- -refresh 240: For 240Hz monitors. Common among competitive players who prioritize motion clarity.
- -refresh 360: For 360Hz monitors. Relevant for professional-level setups where every millisecond of latency counts.
If your refresh rate is not applying correctly after setting this flag, check that Windows display settings also reflect the correct rate. Go to Settings → System → Display → Advanced display settings and confirm the refresh rate matches. Also verify your cable supports the target rate – HDMI 2.0 or DisplayPort 1.2 and above are required for 144Hz and beyond at 1080p.
CS2 FPS Launch Options
If you are targeting higher frame rates, the following combination of cs2 fps commands and launch options is a solid starting point:
+fps_max 0 -nojoy -high -fullscreen +mat_disable_fancy_blending 1 -forcenovsync +r_dynamic 0 +mat_queue_mode 2 -softparticlesdefaultoff
A few notes on FPS optimization in CS2 specifically:
- Sub-tick system: CS2 uses a sub-tick architecture rather than a fixed server tickrate like CS:GO 64 or 128 tick. This means -tickrate 128 has no effect on official servers – it only applies to local offline practice servers and bot matches.
- GPU driver matters: Keep your NVIDIA or AMD drivers up to date. Newer driver versions often include CS2-specific optimizations that outperform any combination of launch options.
- In-game settings first: Launch options for FPS are supplementary. Setting your in-game graphics to Low or Medium will have a far greater impact than launch options alone.
CS2 Launch Options for NVIDIA vs AMD
Some launch options behave differently depending on your GPU manufacturer. Knowing which options are relevant to your hardware helps avoid adding commands that do nothing – or worse, cause instability.
- NVIDIA users: Stick with DirectX 11 (the default in CS2). Avoid -vulkan unless you are specifically testing it, as Vulkan gains tend to be more consistent on AMD hardware. If you have an NVIDIA RTX card, enable NVIDIA Reflex Low Latency in the CS2 video settings – this reduces system latency more effectively than any launch option and works on top of your existing configuration.
- AMD users: The -vulkan flag is worth testing. Vulkan can provide a meaningful FPS uplift on AMD GPUs in CS2 compared to the DirectX 11 default. Add it to your launch options, run a few deathmatch sessions, and compare average FPS and stability. If you see improvement, keep it. If you notice crashes or visual artifacts, remove it.
- Both: +mat_queue_mode 2, +fps_max 0, -forcenovsync, and -nojoy are hardware-agnostic and beneficial regardless of your GPU brand.
CS2 Launch Options for Low-End PCs
If your system struggles to maintain stable FPS, use the FPS-focused combination above and additionally reduce these in-game settings:
- Shadow Quality: Set to Low or Very Low. Shadows are one of the most GPU-intensive settings in CS2.
- Shader Detail: Low or Medium – reduces GPU load during smoke grenades and molotovs.
- Multicore Rendering: Always keep this Enabled regardless of your hardware. CS2 is optimized for multi-core CPUs.
- Boost Player Contrast: Enable this – it makes enemy models stand out more clearly against backgrounds and is free in terms of performance cost.
- Global Shadow Quality: Reducing this to Medium or Low provides a noticeable FPS gain with minimal impact on competitive visibility.
- Texture Detail: Reducing texture quality lowers VRAM usage and can prevent stutters on cards with 4GB or less VRAM.
CS:GO Launch Options That No Longer Work in CS2
A large number of guides online still recommend CS:GO-era commands that do nothing in CS2. Here is a list of the most commonly cited outdated options:
- -tickrate 128: Had an effect in CS:GO. CS2 uses a sub-tick system – there is no client-side tickrate to set for official servers.
- -novid: Removed the Valve intro clip in CS:GO. CS2 no longer uses that intro clip, so this command has no effect.
- -d3d9ex / -nod3d9ex1: Affected DirectX 9 behavior in CS:GO. CS2 runs on DirectX 11 – these commands do nothing.
- -limitvsconst: No longer functional in CS2.
- -threads [number]: CS2 manages thread allocation automatically. While the command technically parses, using it can cause instability and is not recommended. Let the engine handle it.
- -r_emulate_gl: OpenGL emulation flag from the CS:GO era. No effect in CS2.
- -no-browser: Was used to disable the in-game browser. Not applicable in CS2.
Troubleshooting Launch Options
If you experience crashes, performance drops, or unexpected behavior after adding launch options, follow these steps:
- Remove all launch options: Clear the launch options field entirely and start CS2. If the problem disappears, add commands back one at a time to identify the culprit.
- Verify game files: In Steam, right-click CS2 → Properties → Local Files → Verify Integrity of Game Files. Corrupted game files can cause issues that look like launch option conflicts.
- Update GPU drivers: Outdated drivers are a common source of CS2 instability. Visit NVIDIA or AMD website for the latest version.
- Avoid -threads: As mentioned above, manually setting the thread count can cause instability. Remove it if you have it.
- Check for syntax errors: Every launch option must start with – or +, be separated by a space, and contain no quotation marks or brackets. Even a single misplaced character will break a command.
- Use -autoconfig cautiously: This resets all game settings to default on every launch. Only use it temporarily to diagnose issues, then remove it.
Autoexec vs Launch Options: What is the Difference?
Players new to CS2 configuration often use these two terms interchangeably, but they serve different purposes and work at different stages of the game startup process.
Launch Options
Launch options are entered in Steam before the game executable even starts. They control low-level behavior: which rendering API to use, whether to cap FPS, whether to run in fullscreen, and so on. These settings are applied by the engine at initialization and cannot be changed while the game is running. Think of them as startup instructions handed to the game before it opens.
Autoexec
An autoexec (autoexec.cfg) is a plain text file containing console commands that execute automatically once CS2 has fully loaded. It runs inside the game, so it can control anything accessible via the developer console: crosshair settings, radar configuration, buy binds, network rates, viewmodel position, and more. To activate an autoexec, place the file in your CS2 autoexec cfg folder and add +exec autoexec.cfg to your launch options – or simply name the file autoexec.cfg, as CS2 will detect and run it automatically on startup.
Which Should You Use?
Use launch options for engine-level settings that must be defined before the game starts: rendering API, FPS cap, fullscreen mode, refresh rate. Use an autoexec for everything else – network rates, crosshair, binds, and any console command you want persisted across sessions. The two tools complement each other and are most effective when used together as part of a complete setup.

I’m John Stevens, guy who is completely passionate about playing CS2. For me, it’s not just a hobby, it’s a way of life. I spend most of my time developing strategies, practicing, and participating in amateur championships.
Through this blog, I aim to inspire, entertain, and unite other gamers.
So join me on this incredible journey through the cs2 world. Together, we will explore the ins and outs of CS2, discuss the latest gaming news, and dive into the exciting world of eSports. My blog is created to provide insights, reviews, and thought-provoking content that will keep you coming back for more.